This process was a bit of a pain in the rear, so I’m documenting it in case it comes in handy again.
Source from these sites:
Original source: Stack Overflow
If you want to try x11vnc: linuxconfig.org
General concept from: Medium.com
Grey screen trouble shooting Digital Ocean and Onkea Academy
Sending VNC Through SSH Kate’s Comment and TigerVNC
- Update the account using:
sudo apt-get update - Install the desktop:
sudo apt-get install -y ubuntu-desktop
The Stack Overflow site goes through the trouble of setting up a separate user to run the GUI with. Not sure if that’s necessary, but here it is anyway.
- Create a new user with password login
sudo adduser -m awsgui
sudo passed awsgui
You will be prompted for a password, then:
sudo user mod -aG admin awsgui
sudo vim /etc/ssh/sshd_config # edit line "PasswordAuthentication" to yes
sudo /etc/init.d/ssh restart - Now to add a VNC server (which one shouldn’t be too important). The Stack Overflow site suggests vnc4server.
sudo apt-get install vnc4server - Now over on the Amazon EC2 configuration site, we need to open port 5901 for the VNC connection.
- Click the radio button next to your instance
- In the description tab, Security Group section, click launch-wizard-2
- Under Inbound Rules, Click the Edit button, then Add Rule
- You should end up with something like this:
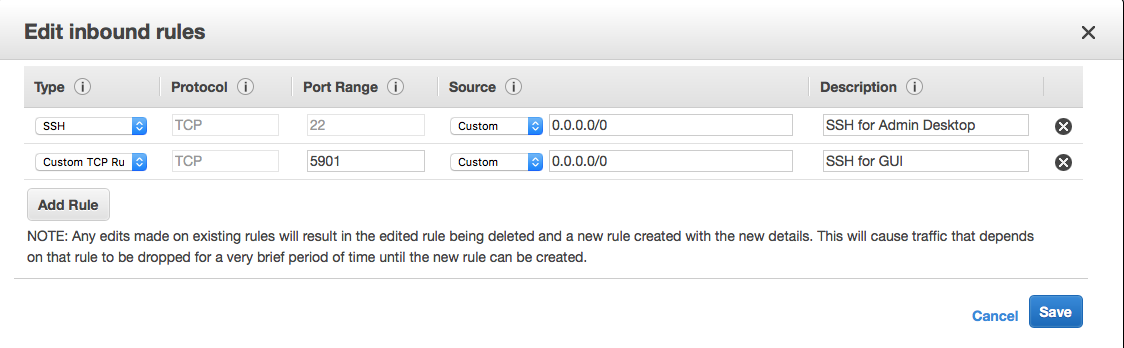
- Now set up the VNC server,
su - awsgui
vncserver
vncserver -kill :1
vim /home/awsgui/.vnc/xstartup - Uncomment (by removing the #) the lines that state: “Uncomment the following two lines for normal desktop”
- Add
shto the second line, so it reads:
exec sh /etc/X11/xinit/xinitrc. - Save and exit
- Add the following:
sudo iptables -A INPUT -p tcp --dport 5901 -j ACCEPT - Start vncserver again with
vncserver - Note the Public DNS details from Amazon, and use them to connect with a VNC client: YOUR_AMAZON_PROVIDED_INSTANCE_ID.amazonaws.com:1 (NOTE: the :1 at the end is important!)
- If there is a grey screen, there are two potential fixes. One is to add stuff to the xstartup file. Namely,
#!/bin/sh
 def
 export XKLXMODMAPDISABLE=1
 unset SESSIONMANAGER
 unset DBUSSESSIONBUSADDRESS

 gnome-panel &
 gnome-settings-daemon &
 metacity &
 nautilus &
gnome-terminal & - The other alternative suggested from the Stack Overflow site is run as the same user name as you are SSHing with.
Now there are many fine ways of establishing the VNC connection, RealVNC, TigerVNC, etc. Since this connection is going to be a Mac client to a Linux server, we can use the Mac’s built in VNC screen sharing to get the mojo going. However, we need to take an additional step to A) connect with the private key from Amazon, and B) put our VNC connection through an SSH tunnel since Screen Sharing by default does not accomplish that.
The advantage of using the native Screen Sharing over RealVNC is that the latter does not permit you to log in as other users with the basic Home version of the software. Hooray! Screen Sharing and TigerVNC do allow this behavior.
Start the SSH tunnel using the command:
ssh -i "/YOUR_USER_DIRECTORY/.ssh/PrivateKey.pem" awsgui@ec2-IP_ADDRESS_FROM_AMAZON.compute-1.amazonaws.com -L XXXX:localhost:5901
Where YOUR_USER_DIRECTORY is where you put your PrivateKey, the IP_ADDRESS_FROM_AMAZON is the IP address AWS gave you to connect with, and the XXXX can be any port on your machine. The -L bit tells SSH to make a connection from port XXXX on your side through localhost over to 5901 on the VNC client side.
Finally, to run the VNC client, open up Screen Sharing with Cmd+K, and type in:
vnc://localhost:XXXX
That should do the trick!